Time for a break from making finnicky desserts and time for some down-to-earth comfort cookies. I fished out a recipe for these cookies that I got from my long time neighbour, Kelly. I remember she brought a freshly baked batch over to our house and they were gone in no time flat.
I can’t remember the last time I made these, probably because the kids can’t take these in their school lunches (or rather, I won’t let them–there are no laws here in California that prevent kids from bringing peanut and nut products to school, unlike in Ontario where Sabrina’s Law exists).
Some would argue these cookies bake best with processed peanut butter like Kraft or Skippy, but I only buy natural peanut butter. Just peanuts!
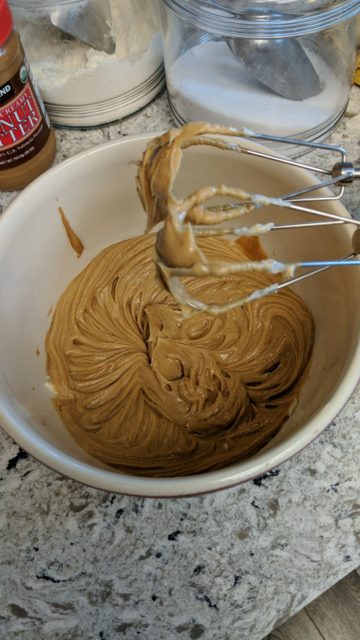
The butter mixed with the peanut butter was so creamy when I blended it together with the hand mixer.
Creamy peanut butter and unsalted butter
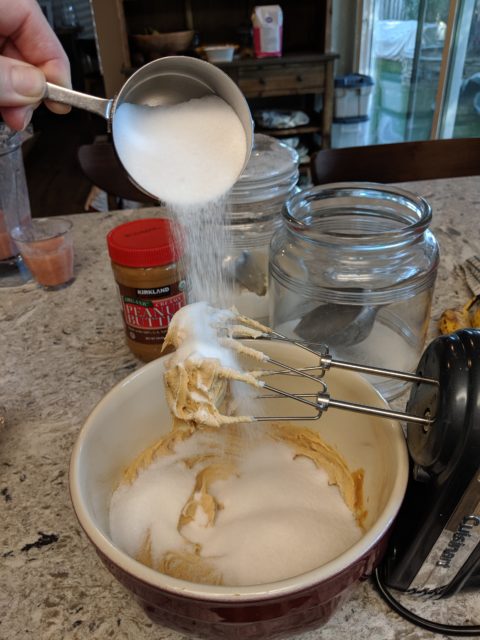
Then I added the requisite sugar, eggs and flour and voila! beautiful cookie batter.
Yes, sugar
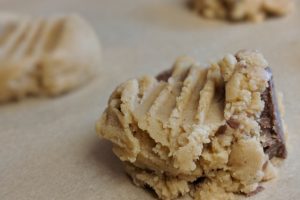
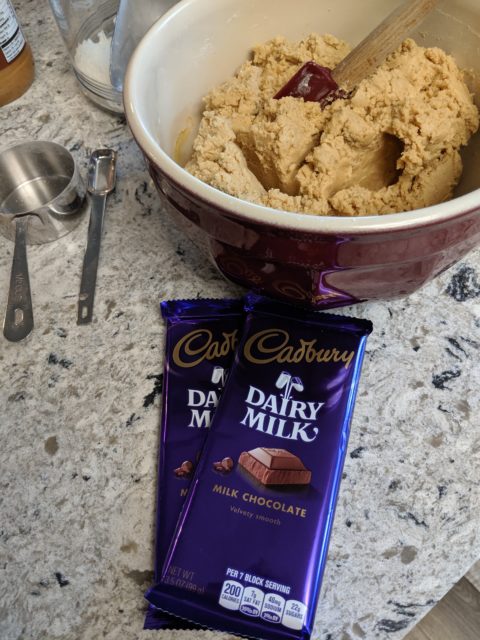
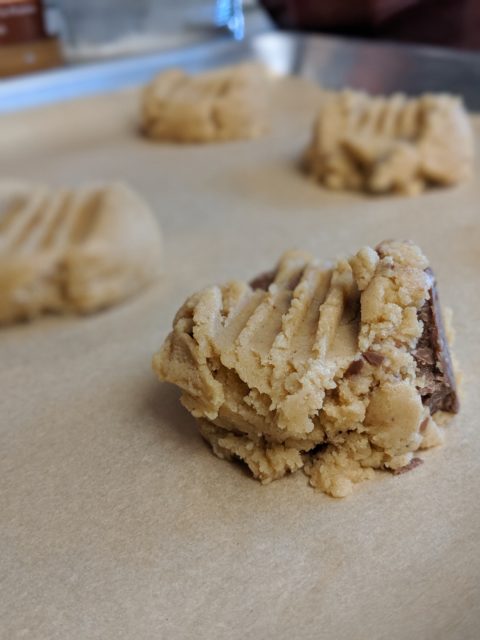
I found a couple of Dairy Milk bars in the cupboard and decided to crush them up and throw them in the batter instead of using chipits and I’m glad I did.
Chocolate + peanut butter= sheer perfection
Just before baking, I used the back of a fork to press the requisite hash marks into each cookie. Because, peanut butter cookies. Right?
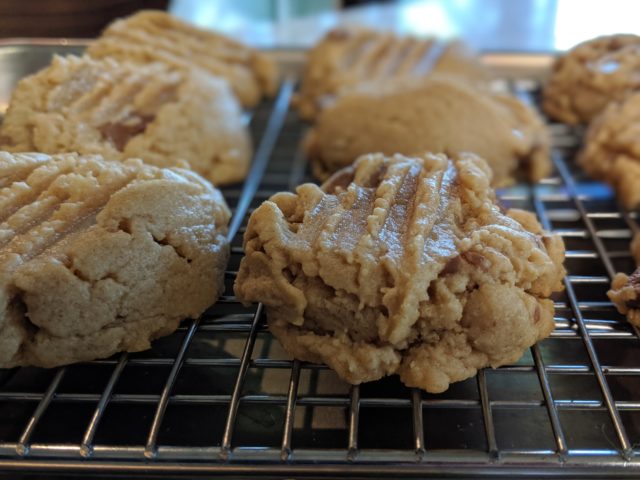
The resulting cookies were so creamy and delicious, and once again, they disappeared within a few days. I think the milk chocolate chunks also made a big difference.
These were quick and easy to make and didn’t require much, if any, skill or precision. So go make some!!!
Fork tine marks are required in peanut butter cookiesLet the cookies completely on a wire rack–if you can resist!
Kelly’s Peanut Butter Cookies
1 Cup peanut butter (I like to use all natural smooth PB)
1 Cup unsalted butter, softened
2 eggs
1 Cup granulated sugar
1/2 Cup brown sugar
1 tsp baking powder
2 1/2 Cups, all purpose flour (or you can do half whole wheat flour for a slightly denser cookie)
2 bars of your favourite chocolate bar (I used Dairy Milk), crushed up into chunks
Instructions
Preheat oven to 350 degrees
Blend peanut butter and butter together in a standing mixer or with a hand mixer until completely incorporated
Add eggs and blend followed by sugars
Add baking powder and flour(s) and blend until ingredients are incorporated.
Mix in chocolate chunks until evenly distributed
Scoop 1″ balls of dough onto parchment-lined cookie sheet
Take the back of a fork and press firmly down until fork tine marks appear in flattened cookie (but not too hard!)
Bake for ~10 minutes until cookies are lightly browned
Transfer to a wire rack to cool completely (if you can wait that long!)
So if you thought I had a death wish when I decided to tackle puff pastry, think again. Pastry, shmastry! Puff pastry was a cake walk compared to making French macarons for the first time. Now I know why Laduree and Nadege charge a pretty penny for these dainty sweets.
To be honest, I didn’t spend a ton of time researching this recipe and maybe my results are proof that I should have spent more time studying before breaking out the almond flour. But I had six egg whites in the fridge after making those yummy Portuguese custard tarts. And I think I was feeling a little overconfident after making those divine tarts, nay, impatient to prove I could succeed again at making a *Patchka* recipe.
So here’s the deal with French macarons: historians tell a story of their origins in the 18th century around the time of the French revolution. Nuns who were seeking asylum made the meringue-like biscuits to sell in order to pay for their lodging at the local convent (there seems to be a pattern here with members of the cloth having a knack for baking–Portuguese custard tarts, anyone???). However, there are many other versions of the dessert that apparently date back as far as the 8th century.
And the name alone actually comes from the Italian “maccherone,” which means fine dough. There are accounts of future Queen of France, Catherine de Medici bringing the recipe over from Italy in the 1500’s.
The macarons we think of today–the two round biscuits sandwiched with a sweet filling in the middle–didn’t gain popularity until the 1930’s.
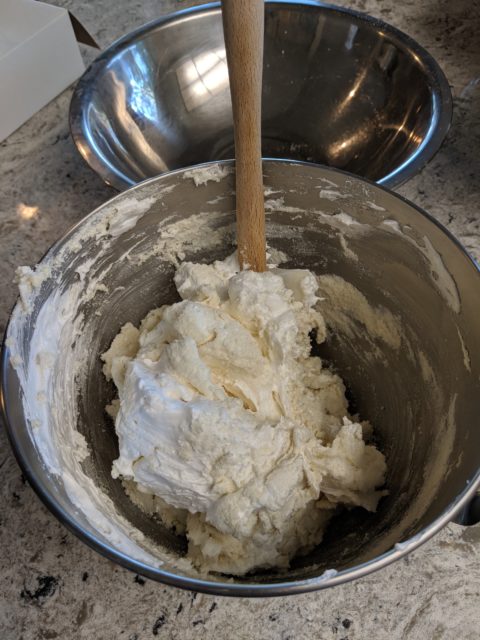
I watched an excellent tutorial by John, over at the Preppy Kitchen. He is meticulous and detailed in his explanation of the what, how and why of making macarons. There is even a term called “macronage” when it comes to incorporating the almond flour and icing sugar mixture with the stiffened egg whites. He is also not above pointing out that it took him many attempts before he got a decent batch of the cookies.
Super fine almond flour and icing sugar are sifted not once, not twice, but three times!Egg whites are whipped to a marshmallow-like consistencyThe delicate dance of “macronage” is underway.
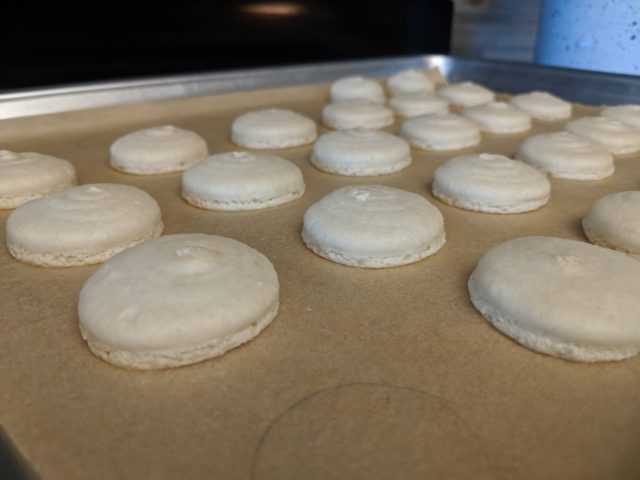
Although I followed his instructions religiously, my biscuits did not come out with a nice glossy finish or crispy exterior as I had hoped. I blame the oven entirely. They taste delicious even if they look a little bit withered. And they are nice and fluffy and chewy.
The results of my first bake
Oh, my dull withered macarons…
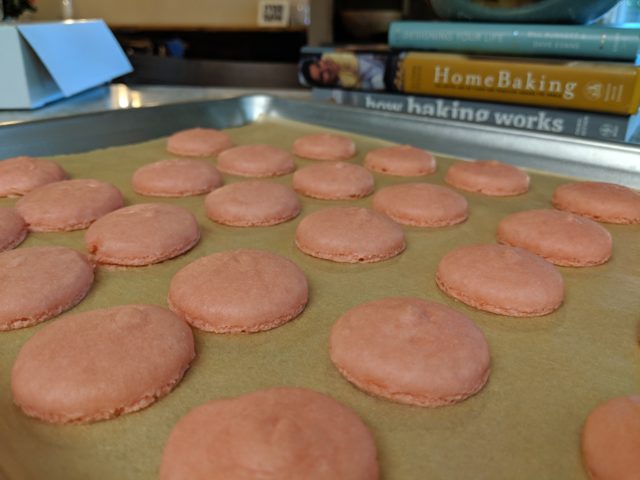
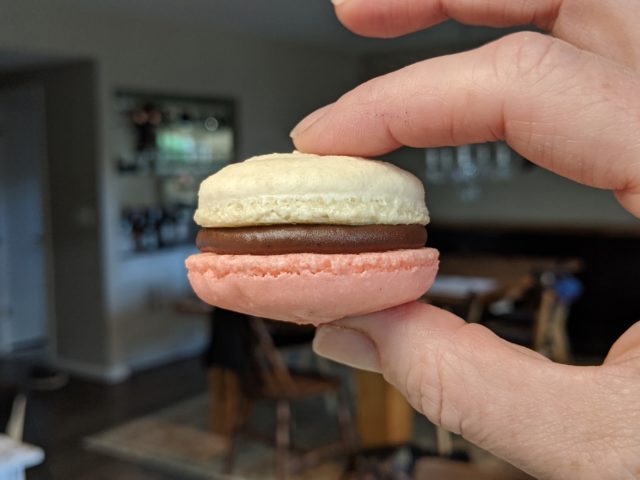
I made a simple chocolate ganache for the filling. Next time I think I’ll try a caramel filling or french buttercream. Or maybe I’ll use some homemade jam!
Kind of looks like a Neopolitan cookie, doesn’t it?
All these ideas have bolstered my resolve to attempt the recipe again. Just not tomorrow. I need to recover from Round One.
My first batch of vanilla macarons with chocolate ganache filling
Did my puff pastry cliff hanger work? Well you needn’t wait any longer! I used about a third of my puff pastry recipe to make Portuguese custard tarts, which are one of my favourite pastries.
While the French introduced the world to puff pastry in the 17th century, the world would have to wait until the 18th century before Pasteis de Nata were invented.
Using my handy dandy Google translator, the literal translation of the pastry’s name is “you’re welcome pastry,” and you should thank the monks and nuns of the Jeronimos Monestery near Lisbon for these delightful creations.
I consulted with my tome on Home Baking, by husband and wife duo, Jeffrey Allford and Naomi Duguid, for the recipe.
I can’t say it was all that difficult to prepare, but you should note that you only use egg yolks for the filling, so plan ahead and make sure you’ve got another recipe up your sleeve for those egg whites (hint: recipe #5 involves egg whites!).
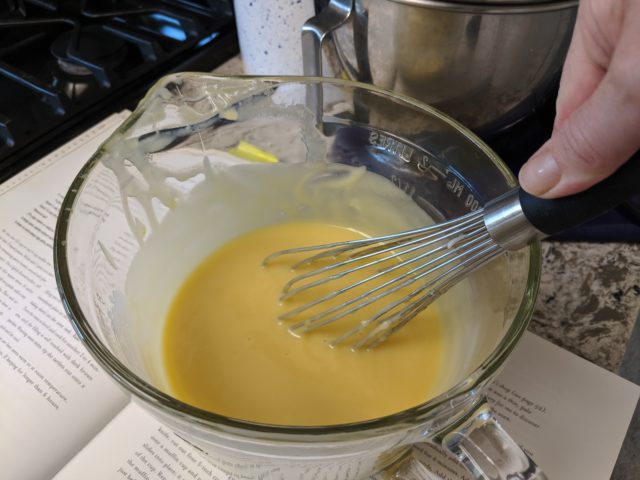
I was pleasantly surprised to learn that the filling didn’t call for much sugar and as such, is not that sweet. But it is creamy and silky smooth and egg-y. The secret, I discovered, was to whisk the mixture excessively so there wouldn’t be a single lump or bump in it.
Whisk that egg-y filling!
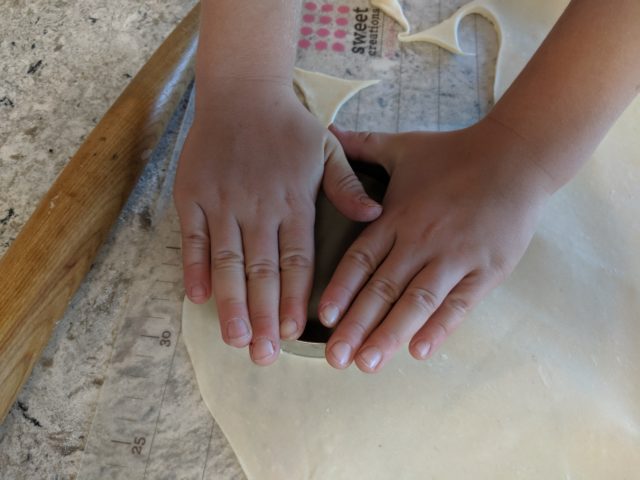
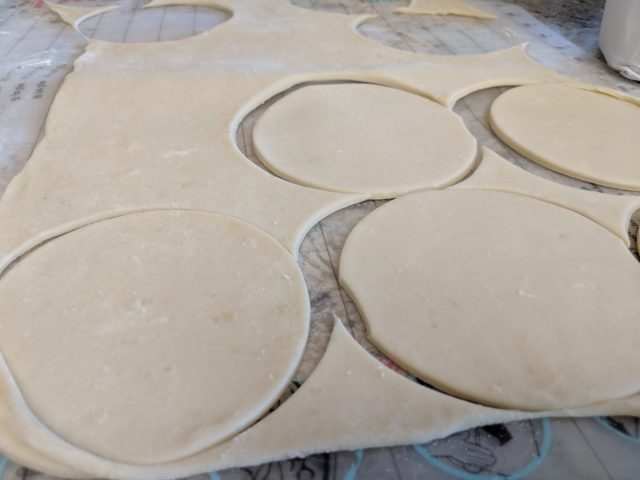
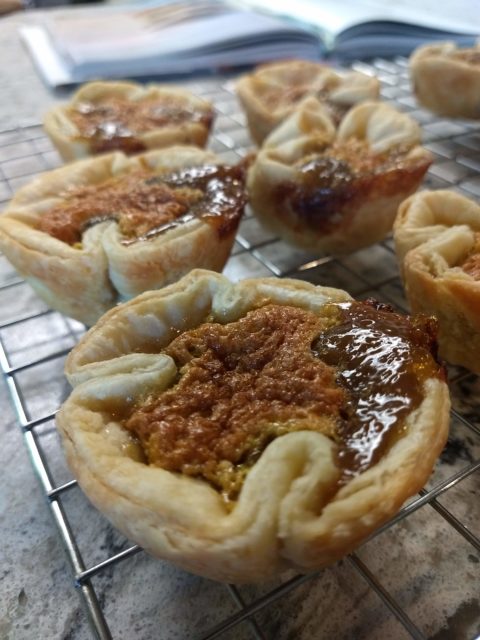
The puff pastry, as you’ll see, was worked very quickly and chilled in the freezer while I prepared the filling (I even had help from some little hands!). It is the perfect vehicle for the filling and compliments to the creamy filling with a crunchy, buttery exterior.
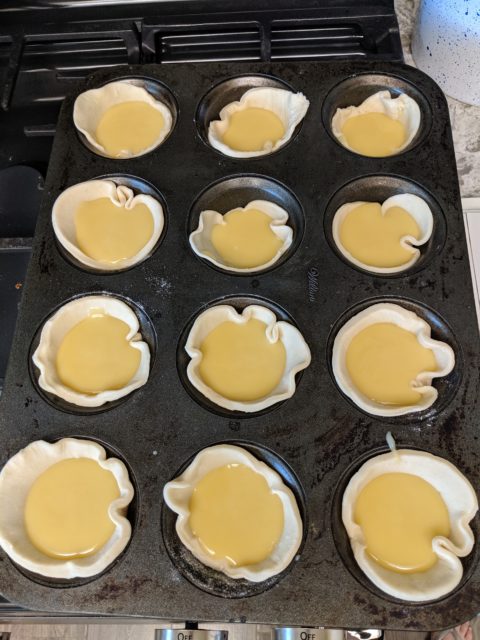
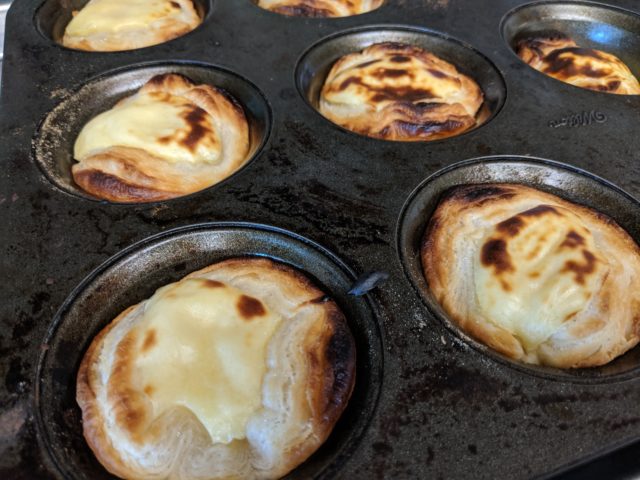
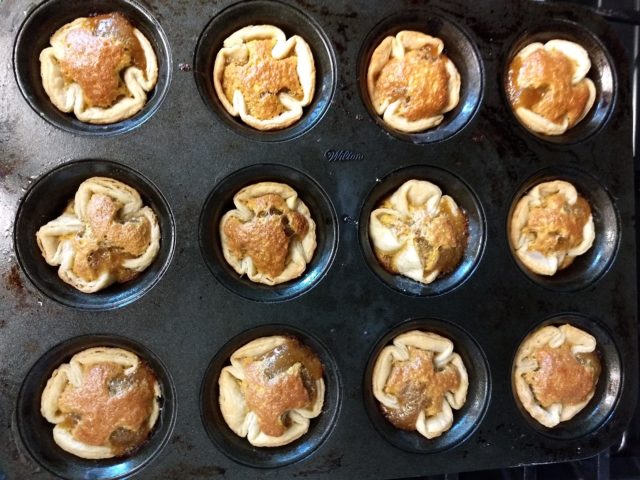
Little hands made the puff pastry work go quickly4 inch rounds were cut out of the puff pastry and placed into a 12 cup muffin tinA perfect marriage of puff pastry and custard
It is baked at a high heat and then at the end gets a quick broil to create that nice browned, almost charred, top.
The finished Portuguese custard tarts straight out of the oven
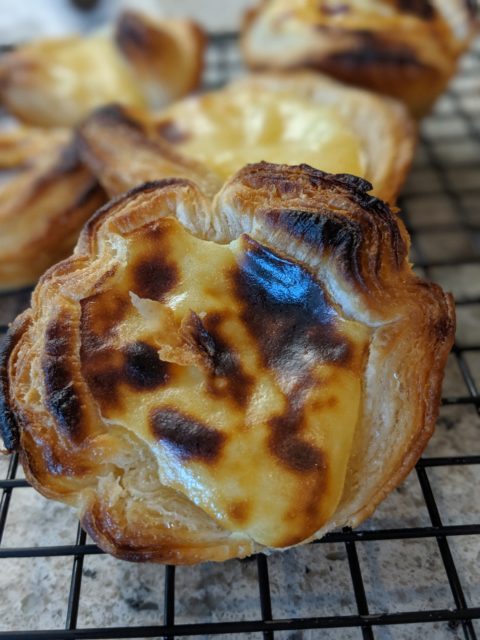
The tarts are very quickly transferred to a wire rack to cool followed shortly thereafter by devouring, gobbling, you name it.
This homemade Pasteis de Nata is ready for its close up
Anyone who wants to make their own puff pastry from scratch must be asking for a death wish, right? Who, in this day and age of convenience foods would dain to make the most Potchka (Yiddish translated: finnicky) pastry known to mankind? That would be me.
I read about making “rough puff” which is the home baker’s shortcut method of making puff pastry. And I did seriously consider doing that as a time saver. But who was I kidding? I knew this was going to take time so why not roll up my sleeves and take the scenic route.
I familiarized myself with the process by watching Anna Olson’s instructional video.
According to lore, puff pastry was invented by a French pastrycook’s apprentice in the mid 1600’s. Apparently there is evidence that something akin to French puff pastry already existed in Spain, and of course, in Greece there was phyllo dough (which I haven’t attempted to make yet). Regardless of its origins, puff pastry only gained in popularity with the passage of time and is now used as a staple in all sorts of patisserie.
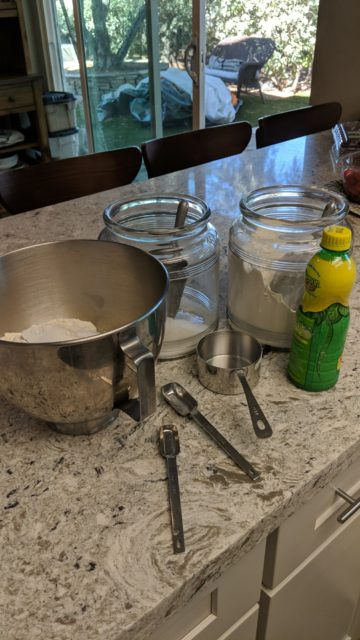
The process starts with making the detrempe–that’s the flour, water and a bit of butter “base.”
Setting out the ingredients for my puff pastry
This is followed by the beurrage, which is just pounds of butter (that’s three pounds in this particular recipe to be exact), mixed with a wee bit of flour so that it is maleable and doesn’t turn into a giant blob of greasiness.
Following the instructions closely, both of these were pressed into plastic wrap in an 8 inch by 8 inch pan and then placed into the fridge to chill for a minimum of 2 hours.
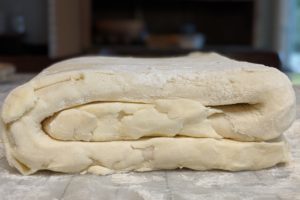
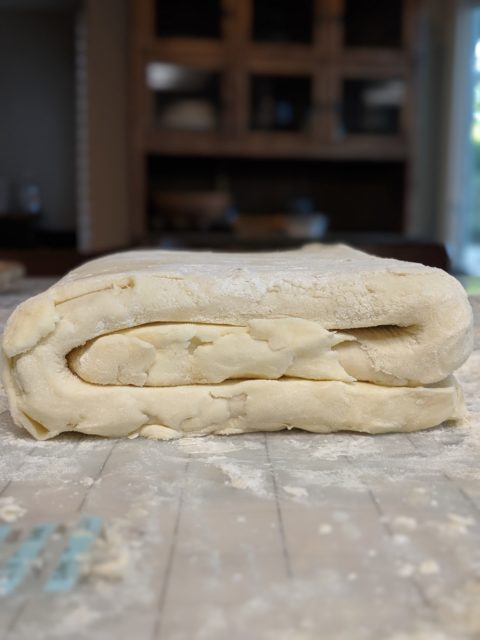
The next step involves laminating the detrempe and the beurrage together without compromising the integrity of each layer. Both need to be cold but maleable enough to roll out. I followed Anna’s suggestion and actually wrapped the flour mixture in the butter, which is not how most recipes suggest doing it.
That is butter (ALOT of butter) wrapping around the dough
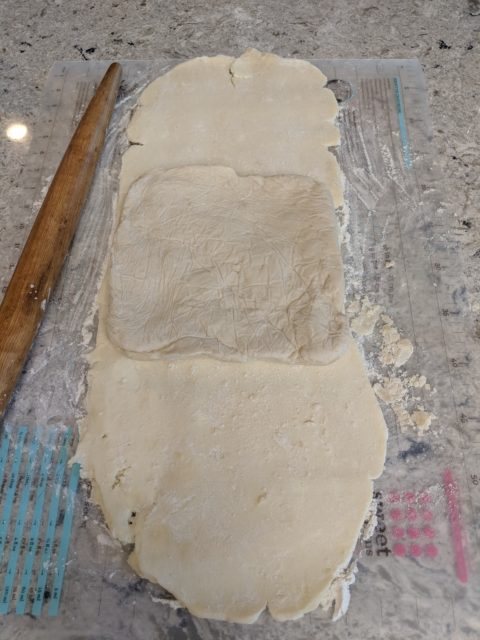
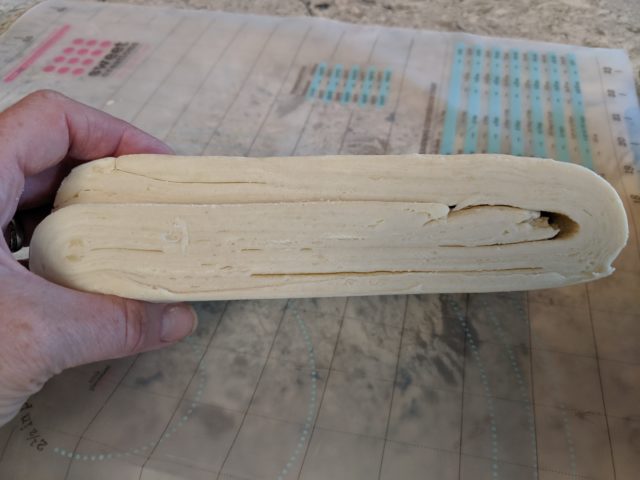
I worked quickly so as not to melt the butter layer. I folded and turned my sheets of pastry on itself in thirds a couple times before wrapping it up in a neat package and popping it back in the fridge for more chill time.
I repeated this a couple of times so there would be a good 12 layers or so.
Then I had to figure out what to make with this precious dough…would it be croissants? Tarts? Turnovers? Or should I go savoury and make something like Beef Wellington? Or chicken pot pie? You’ll have to wait until my next post to find out!
It may not look like much, but that is the beginnings of puff pastryThe laminated puff pastry, ready to become something delicious to eat!
The only reason I’m posting this right now is because I’m feeling a tad patriotic (and because some fellow Canadian moms asked for the recipe!). At the time of writing, the Raptors are in the NBA finals against the Golden State Warriors, who play but an hour away from the home I am sitting in right now. #WeTheNorth mania has taken over Toronto and much of the country north of the 49th parallel, not to mention a lot of the United States. There is even going to be a viewing party in San Francisco for one of the games co-hosted by the Canadian Consulate and Maple Leaf Sports and Entertainment (the owners of the team).
It also feels like summer outside and I equate butter tarts with summer, not to mention Canada Day, which is around the corner too.
I’ve tried a few butter tart recipes, but I think this one is my favourite so far. The pastry is super easy to make and easy to manipulate–IF you follow the instructions.
And the filling is also straightforward. You are more than welcome to add raisins, pecans, craisins, or whatever your heart desires. I’m a purist and like to keep it plain. They are super rich, super sweet with a super flakey pastry and super worth the time and effort.
You’re non-Canadian friends will thank you, but be careful: once you share these with them, they will want them again. And again. And again.
Rosie Daykin’s Quintessential Butter Tart
Start by making All Butter Pastry (makes enough for a couple dozen tarts)
5 cups of all-purpose flour
1 teaspoon salt
2 cups butter, chilled and cut into 1-inch cubes
1 large egg
1 tablespoon white vinegar
water
Place flour and salt in a large bowl, drop the butter all over the flour mixture. Using a pastry cutter, cut the butter into the flour until it resembles large crumbs. You should still be able to see some butter in the flour.
Crack the egg into a liquid measuring cup and add the vinegar. Top up with enough cold water until it reaches 1 cup. Whisk until combined. Pour over the flour and butter mixture.
Mix with a fork until the dough starts to come together and looks ragged. Use your hands to gently finish mixing the dough and it takes shape. You should still see some butter bits!
Divide the dough into four even disks about 1/2 an inch thick. Wrap in plastic wrap and refrigerate for a minimum of 2 hours or better yet, overnight.
Now prepare the filling:
3 large eggs
1 1/2 cups light brown sugar
1 1/2 teaspoons vanilla extract
3/4 teaspoon lemon juice
1/2 teaspoon salt
3 cups of sultana raisins (if you like raisins!)
Whisk all the above ingredients together and put in a liquid measuring cup with a spout so it’s easy to pour.
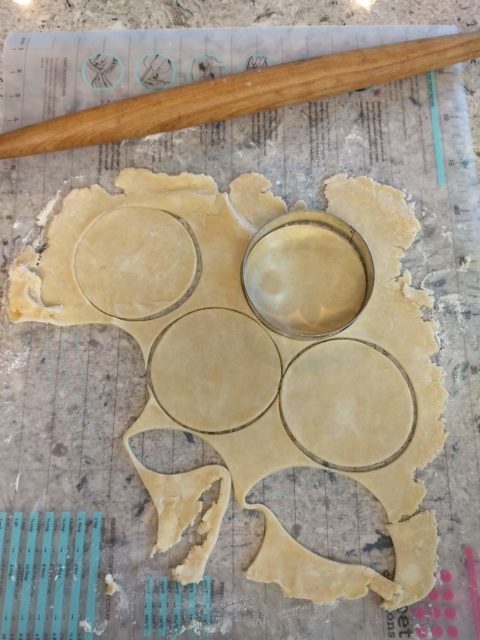
Roll out the chilled pastry on a floured surface with a rolling pin to about 1/8 inch thick. Use a 4 or 5-inch circular cutter to cut out the pastry circles.
Make sure your muffin tin is well greased with shortening (I use Crisco).
Rosie’s secret technique: Take each circle and pinch it at two points, best visualized as 3 o’clock and 9 o’clock. Then lift up and pinch 12 o’clock and 6 o’clock and place in the muffin tin. Fill the tin with the pastry and then chill in the fridge for about 10 or 15 minutes.
Fill each tart shell with about 2 Tbsp of raisins (or not). Then top with the filling until 2/3 full.
Bake in a 350 degree oven for about 20 minutes or until the pastry has browned and the centre of the tarts are puffed and golden.
Make sure not to drip the filling down the side of the muffin tins, otherwise the sugar mixture will stick to the pan and you will have trouble getting the tarts out.
Allow tarts to cool a bit before removing from pan.
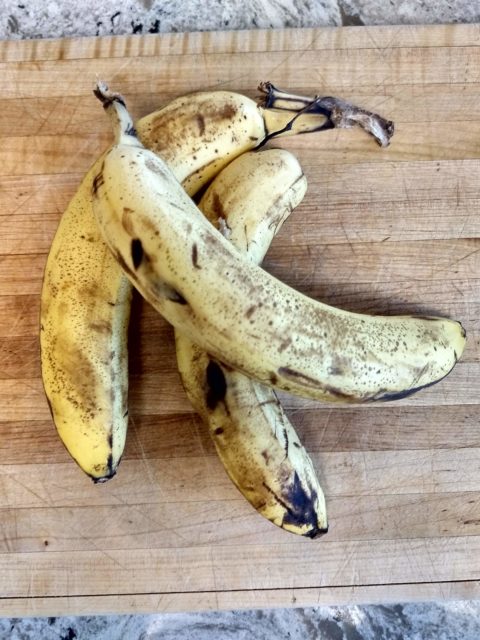
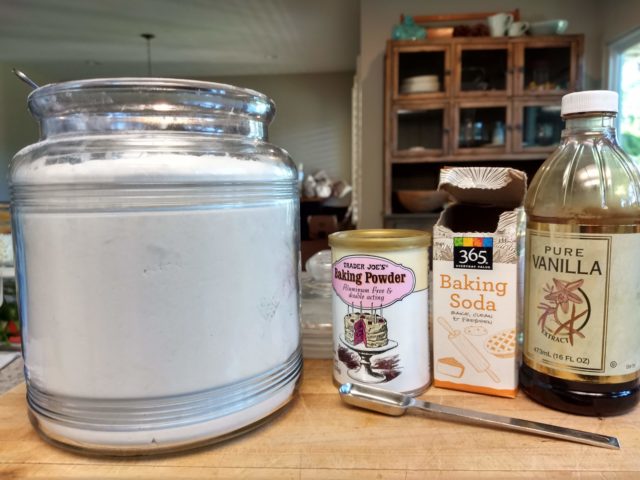
Browning, slightly bruised bananas: perfect for making cake!
Clearly I couldn’t wait to get started on this baking project! But the truth is, it was the bananas that couldn’t wait. They had passed their peak for eating, and had been languishing on the kitchen counter for a couple of days practically begging me to turn them into a sweet and moist semi-healthy dessert (okay, not so healthy if it falls into the dessert category).
I got this recipe from my mother many, many years ago and pretty much know it off by heart. It is dairy-free, which I consider to be a positive. However, it does call for A LOT of sugar. I think I could probably cut down on the sugar, but I haven’t tried yet.
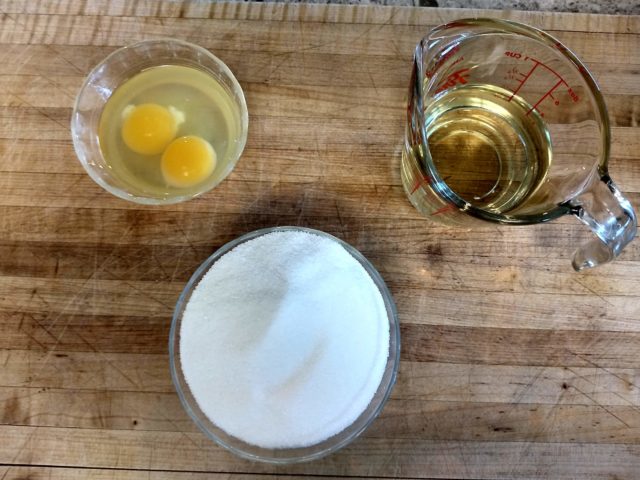
Two eggs, half a cup of canola oil and a full cup and a half of sugar go into this cake
Flour, baking powder, baking soda and vanilla are added after the wet ingredients are combined
Sometimes I bake this batter into muffins so the kids can take it to school in their lunches, or I’ve even done it in a loaf pan, but it seems to have a hard time baking through the centre because it’s such a wet batter.
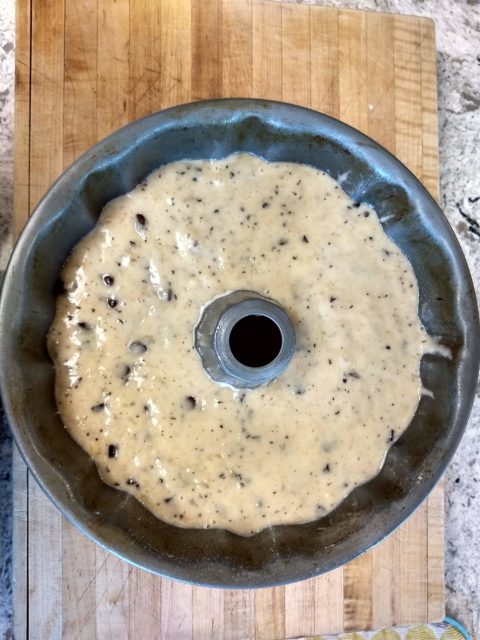
Today I went for the classic bundt cake, which makes it bake up beautifully with a deep brown outer layer. An important note about the chocolate chips: if you use full size semi-sweet chocolate chips, they sink to the bottom of the batter, thus sticking to the side of the pan so that when you turn it out, your cake will have pock marks. I confess, I used about half a cup in this recipe, but I also added in chopped up semi-sweet chocolate bits and they did not sink to the bottom of the pan.
A well greased bundt pan will make it easy to turn the cake out after baking
The recipe I normally use also calls for half a cup of either orange or apple juice. I think this simply makes the cake more moist and gives it a nice glossy shine on top. I did not have any juice in the fridge today, but I did have a bowl of homemade apple sauce, so I used that instead and I think I might like the results better this way.
This is one of the most adaptable cakes I have ever made. It’s like an outfit that can go from day to night–it’s a great cake that you can call “bread” if need be, but it can also be fashioned into a layer cake with mocha or chocolate icing for a special occasion, which I have done in the past, particularly for birthday celebrations. Once you’ve made it as many times as I have, you will quickly realize that the threat of bananas going bad in your house is a non-starter because you can take those over ripened fruits and turn them into a delicious cake that is good to eat any day of the week.
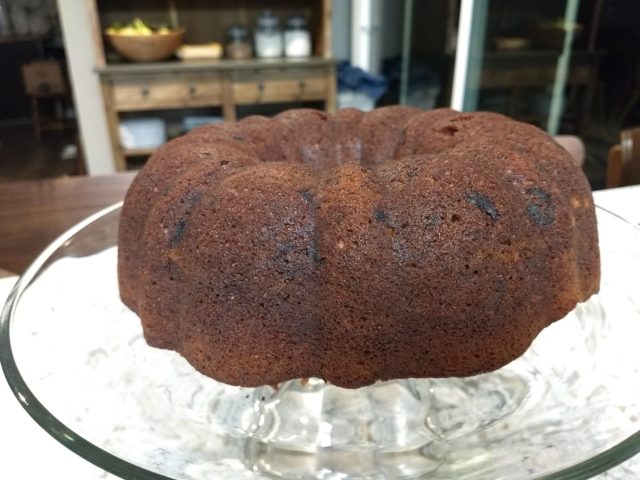
A perfectly baked banana chocolate chip bundt cake
Banana Chocolate Chip Cake/Bread/Muffins
3 overripe bananas
2 eggs
1 1/2 cups of sugar
1/2 cup canola oil
2 cups of flour
1 teaspoon baking powder
1 teaspoon baking soda
1 teaspoon vanilla extract
1/2 cup of orange juice
1 cup of chocolate chips or chunks
DIRECTIONS:
Mix the bananas in a standing mixer or with a hand mixer until they are smooth. Add in the eggs, sugar and oil and mix until thoroughly combined.
Add the dry ingredients, alternating with the remaining wet ingredients (baking powder, then vanilla, then soda, then OJ), mixing after each addition. Add the chocolate chips.
Pour into a well greased bundt pan, or a parchment lined loaf pan, or into muffin cups.
Bake at 350 degrees. Baking times will vary depending on what you are making. Cakes and loafs will take close to an hour to bake, while muffins take between 20 and 25 minutes. Test the cake by inserting a toothpick or wooden skewer into the centre. The toothpick must come out clean or “dry.” Let the cake cool for 10 minutes before turning it out on to a cooling rack.
Muffins can be removed immediately so you can make the next batch–just don’t burn yourself!
Homesickness is a bitch. I don’t remember experiencing this kind of ache for the motherland when travelling overseas as a twentysomething, or even when living in Vancouver while attending university. There are myriad reasons why I could be feeling the way I feel at any given time. Maybe it’s the change in the weather–dark mornings and dusky afternoons, shorter days, a crispness in the morning air. Fall is my favourite time of the year, so maybe it’s the root vegetables, squash and apples that are in season right now that have me pining for home. Whatever “IT” is, I’m craving comfort and comfort foods.
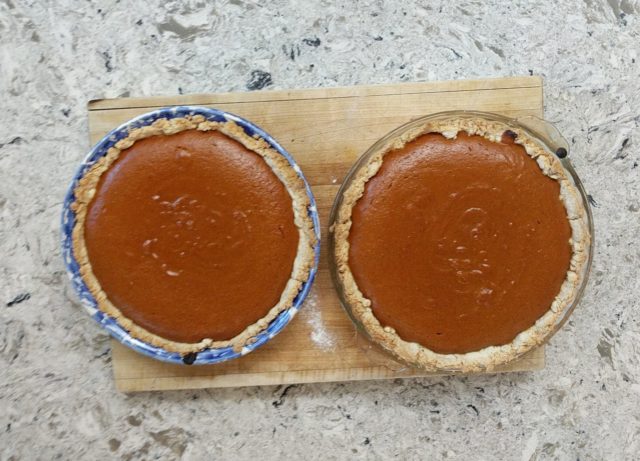
Today I was a bit manic about cooking and I made a pot of pureed butternut squash soup (a la Martha Stewart’s fabulous Everyday Food cookbook) and roasted a batch of golden beets. But things didn’t stop there–I missed the Thanksgiving long weekend up at my parents’ cottage in Thornbury, Ontario and I was really craving pumpkin pie, so I made the requisite two-pie recipe. The first was almost gone before it had completely cooled.
But the soup and the pie were just the bookends–I needed to come up with a really good stick to yer ribs kinda meal. Ribs! That’s it! I had some lovely boneless beef short ribs in the fridge that I thought would be labour-intensive to prepare, but I they weren’t. I sliced up an onion, popped it into a slow cooker, cut up the ribs in chunks, poured some amazing L & L sauce on top (this stuff is like GOLD because I brought a case of 12 jars with me when we moved from Toronto last January). L & L is like umami for grilling or cooking meat, it’s just that good.
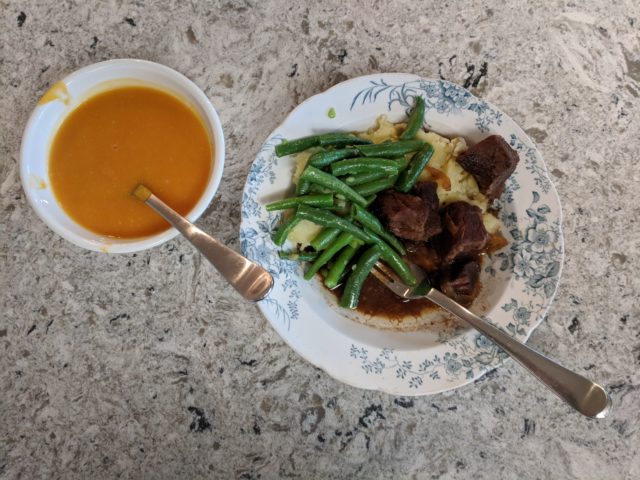
Slow cooker braised short ribs with garlicky mashed potatoes and blanched green beans (and a side of butternut squash soup)
What goes better with slow cooked beef ribs than garlicky mashed potatoes? Nothing. So that’s what I made. Oh! And there were delicious, fresh from the farm green beans, blanched and sauteed in garlic oil.
This was the comfort food meal to end all comfort food meals (until I come up with another–ahem! chicken pot pie).
Double the pleasure: pumpkin pie
But it’s not just comfort food that I’m craving–it’s coziness. It’s Hygge I’m also longing for–that key ingredient to Danish happiness. Pyjamas, sweatpants, sweaters, blankets, slippers, pillows, duvets, LOTS of candlelight, tea with honey, hot chocolate–ANY hot drink and pastries, LOTS of pastries. I have been fairly successful at achieving Hygge in the past, but now that I feel like a displaced person I think my home senses that I am homesick and therefore it is slightly lacking in the Hygge department. So it’s time to pull out the blankets, fluff the pillows, light the candles, bake some cookies, or brownies, or other pastries, put on my flannel pyjamas and get cozy.
I’ve been ignoring my blog. Not really on purpose, but moreso because I don’t want to keep feeding it. I’ve been feeding Instagram and Facebook a lot in the last four months and I must say, social media has an insatiable appetite! I kind of did it to myself–a little over a month ago I took up a year-long challenge to post a photo a day. There have been days when I’ve struggled to think of a decent picture to post (just see the one of my messy kitchen) and it’s only been a month! What am I to do for the next 11 months?!
But I also felt like there wasn’t much I wanted to write about that was related to homemaking, baking, cooking, decor, fitness, etcetera, etcetera. I’m actually waiting for a Duncan Hines cake to come out of the oven right now, so I figured I’d kill some time writing an entry. The cake is for the kids’ graduation. All three are graduating from a milestone year at school. Next year they will all be at different schools and as much as we all commiserate about the demands of parenthood, schlepping them hither and yon to school, daycare, hockey, swimming, blah, blah, blah, I know it will pass in the proverbial blink of an eye.
We are also days away from heading back east for the summer, which means now seems like a good time to reflect on our relocation to Northern California. It’s been almost five months to the day since the Big Move. I won’t lie to you–it’s been difficult for all of us in different ways. I think the biggest challenge for me has been the separation from our family and close friends, which won’t come as a surprise to many of you. I’ve also been really uncomfortable with unemployment. I managed to work remotely for the first three months, which helped immensely with the transition. Had it not been for a good friendship that I have struck up with a fellow Canadian (from Ottawa), I’m not sure I’d be in as good a place as I am now. We are in constant contact without being needy (at least, I hope I’m not!). We go on long walks and hikes regularly and our 11-year-olds have become good buddies.
I also joined the schools Gardening Club and purchased a summer “plot” even though I won’t be here to tend to it. I have made friends with some of the moms at the school who are fellow Garden Clubbers, which has also been a great comfort.
Those amazing Canadian Moms In Silicon Valley have also been my saviours. We are a mixed bunch at various stages of expat-ness, but we have our motherhood and national pride in common and that is a tie that binds us. A big shout out to Kathryn for being my life ring in the choppy seas of relocating.
Finding my “tribe” has kept me afloat on this crazy adventure. So, too, has my husband. I remind myself regularly that I’m not the only one who has had to make adjustments. And yet I feel a great sense of responsibility to each member of the family to make sure they are good, physically, mentally and socially.
Highlights of the Big Move:
Hiking the Quicksilver Foothills (literally in our neighbourhood backyard)
One of the nearby trails I have hiked a few times
Gardening Club at the elementary school
All ready for a fun garden activity with the kids
Exploring the region (oceans and mountains)
Postcard-worthy shot of the Carmel-to-Big Sur coastline along Highway 1
Time…to cook and bake
A one dish dinner that was better than anything we could have got at a restaurant
The finished product
Writing letters home to my friends
I don’t have a photo for this one, because, who really needs to see the envelopes and stamps? But what I DO love is finding the perfect card for the right person. I think many of them would be copyrighted so I’m not about to photograph them and post them on my blog (although who are we kidding? is anyone of any import really going to read this and report me??). I have found solace in putting pen to paper and writing whatever pops into my head and sending it off for my friends to receive in the mail. Maybe I will singlehandedly revive the lost art of letter writing, or maybe not. I just know I’ll keep doing it because it makes me feel good.
Now I’m thinking about my next “move” (no, we aren’t moving to another city) when we return from our summer vacation. I will look for more volunteer opportunities, possibly putting my communications and writing skills to use. I am also considering some self improvement through online courses; maybe I can still learn something as I grow long in the tooth. And of course I need to keep up with my fitness; I still can’t seem to accept the mushy middle that is my mummy tummy, but I’m not willing to give up chocolate and chips, not gonna happen. So I’m going to have to devise another plan to feel good about my body. I think that’s plenty for me to contemplate over the summer.
Okay, the cake is done and it’s late so that’s the end of this post. Besides, I have to wake up at the crack of dawn and drive up to Berkeley to make a big batch of jam….more on that later!!!
This post has been a long time coming…13 years to be exact! Although I didn’t know it thirteen years ago.
My oldest had his Bar Mitzvah just over a month ago and I feel like I’ve just recovered from the big event.
He did an amazing job reading from the Torah, giving his speech to our guests, and maintaining his confidence and composure the entire day. He really shone like a star that day and was deserving of all the accolades and attention.
My job was to set the scene for our guests after the pomp and circumstance and for that I spent many months planning, plotting, “pinning” and preparing. There were so many details and so many checklists, but here, I will give you a brief glimpse into the celebration that followed the ceremony.
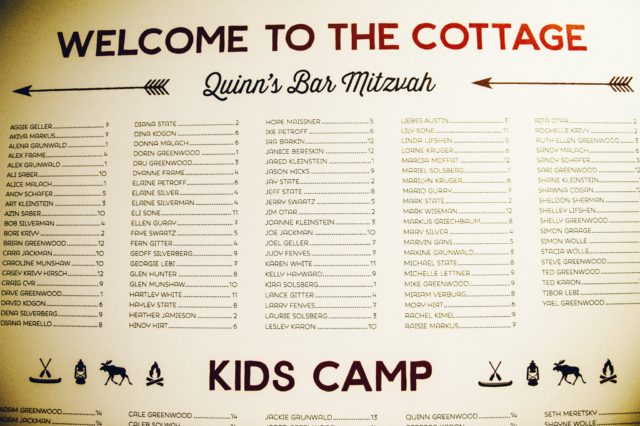
Our brunch began by welcoming our guests to “the cottage.”
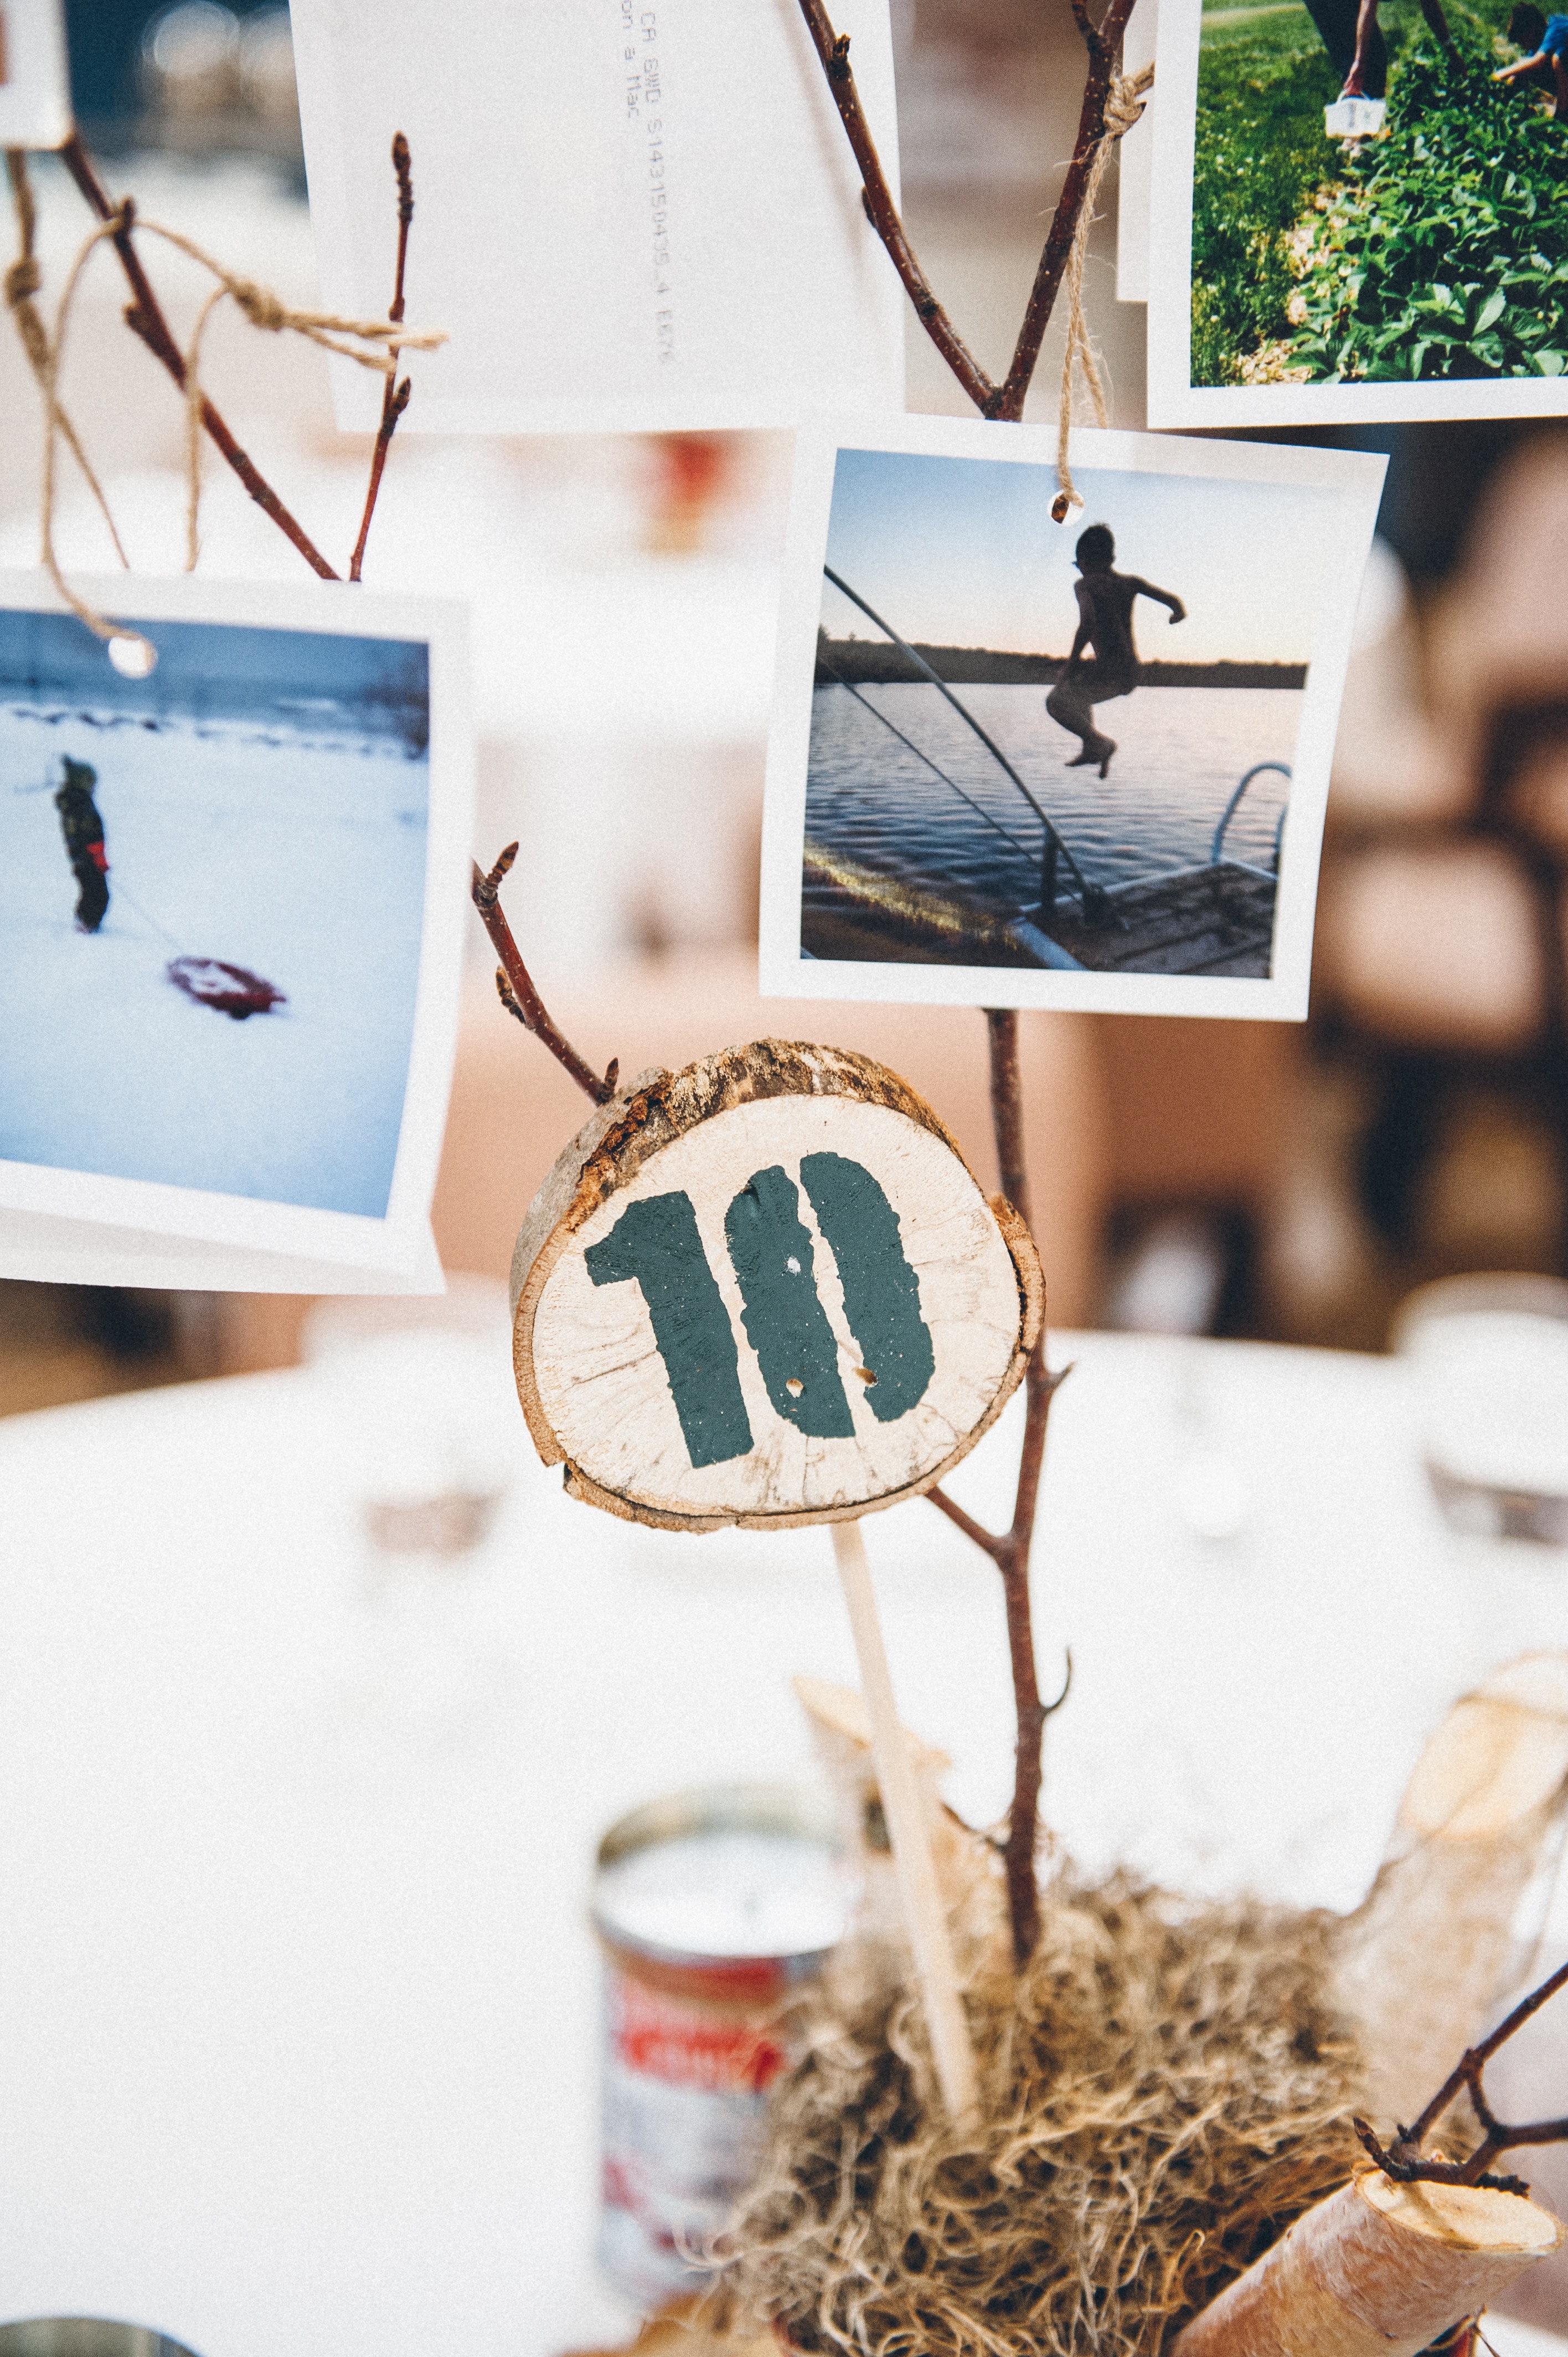
Welcome to the Cottage This was the seating chart for the luncheon
I hired a graphic designer, gave her the guest list in a spread sheet with the table assignments along with some suggested fonts and icons and the dimensions for the foam core board. She was amazing to work with and had the poster delivered right to my front door. We simply mounted the board on an easel right inside the entrance to the reception room.
As people wandered in and found their tables, there was a slide show playing to music projected on to a drop cloth that I had hung on the wall, with patio lights framing it. Â The “screen” was flanked by red plastic Muskoka chairs that were draped with wool camp blankets and throw pillows with wildlife imagery such as owls, deer and moose.
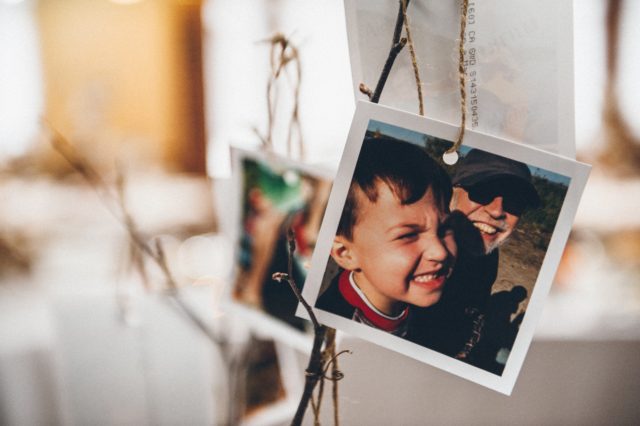
All the photos in the slide show were of the family at various family cottages in both summer and winter. Putting together that slide show was a labour of love. I also printed all the photos on to 4″ x 4″ paper, which were used as part of the centrepieces.
Each photo from the slide show was part of the centrepieces
My mother, my husband and I did an assembly line, punching holes into each photo and tying jute twine through the holes. These photos were then hung on the young birch branches in the centrepieces.
Speaking of the centrepieces–these were probably the cheapest DIY centrepieces ever and yet the most personal. I got little red socker plant pots at Ikea–there was a lot of red in the decor because that is my son’s favourite colour–filled them with pea gravel and off cuts of birch branches from my girlfriend’s cottage in North Bay, and the young birch branches were from my mom’s cottage on Georgian Bay.
We stood the pots on round wood “coins” that my husband cut with his chainsaw from fallen trees in the ravine in our neighbourhood. I just had to schlep them all to the car!
And the final touch were the rocks around the bottom of the pot, which were collected by me and my son from the harbour near my mom’s cottage.
So I think all told, we spent about $5 on each centrepiece and the biggest expense was the printing of the photographs.
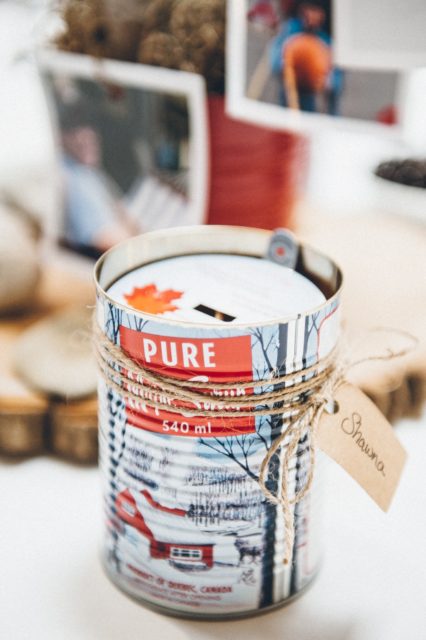
The additional expense came with the guest keepsakes that I put on each table. These were maple syrup candles in tins. They certainly didn’t come cheap, but I thought it was important to give guests a small memento from the day as a thank you from us.
Each guest received a maple syrup candle as a memento
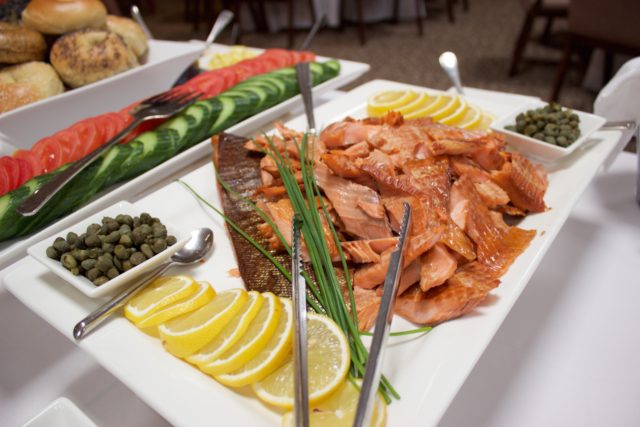
The brunch was delicious, catered by L-Eat. Niki and Tony did a fabulous job and the presentation of the food was simple and elegant. We made sure everything that was served were things we would typically eat for brunch: french toast with maple syrup, quiche, bagels with all the fixings, yogurt with granola and berries, and as a special treat we arranged to have smoked trout from Kolapore Springs trout farm up near my parents’ cottage.
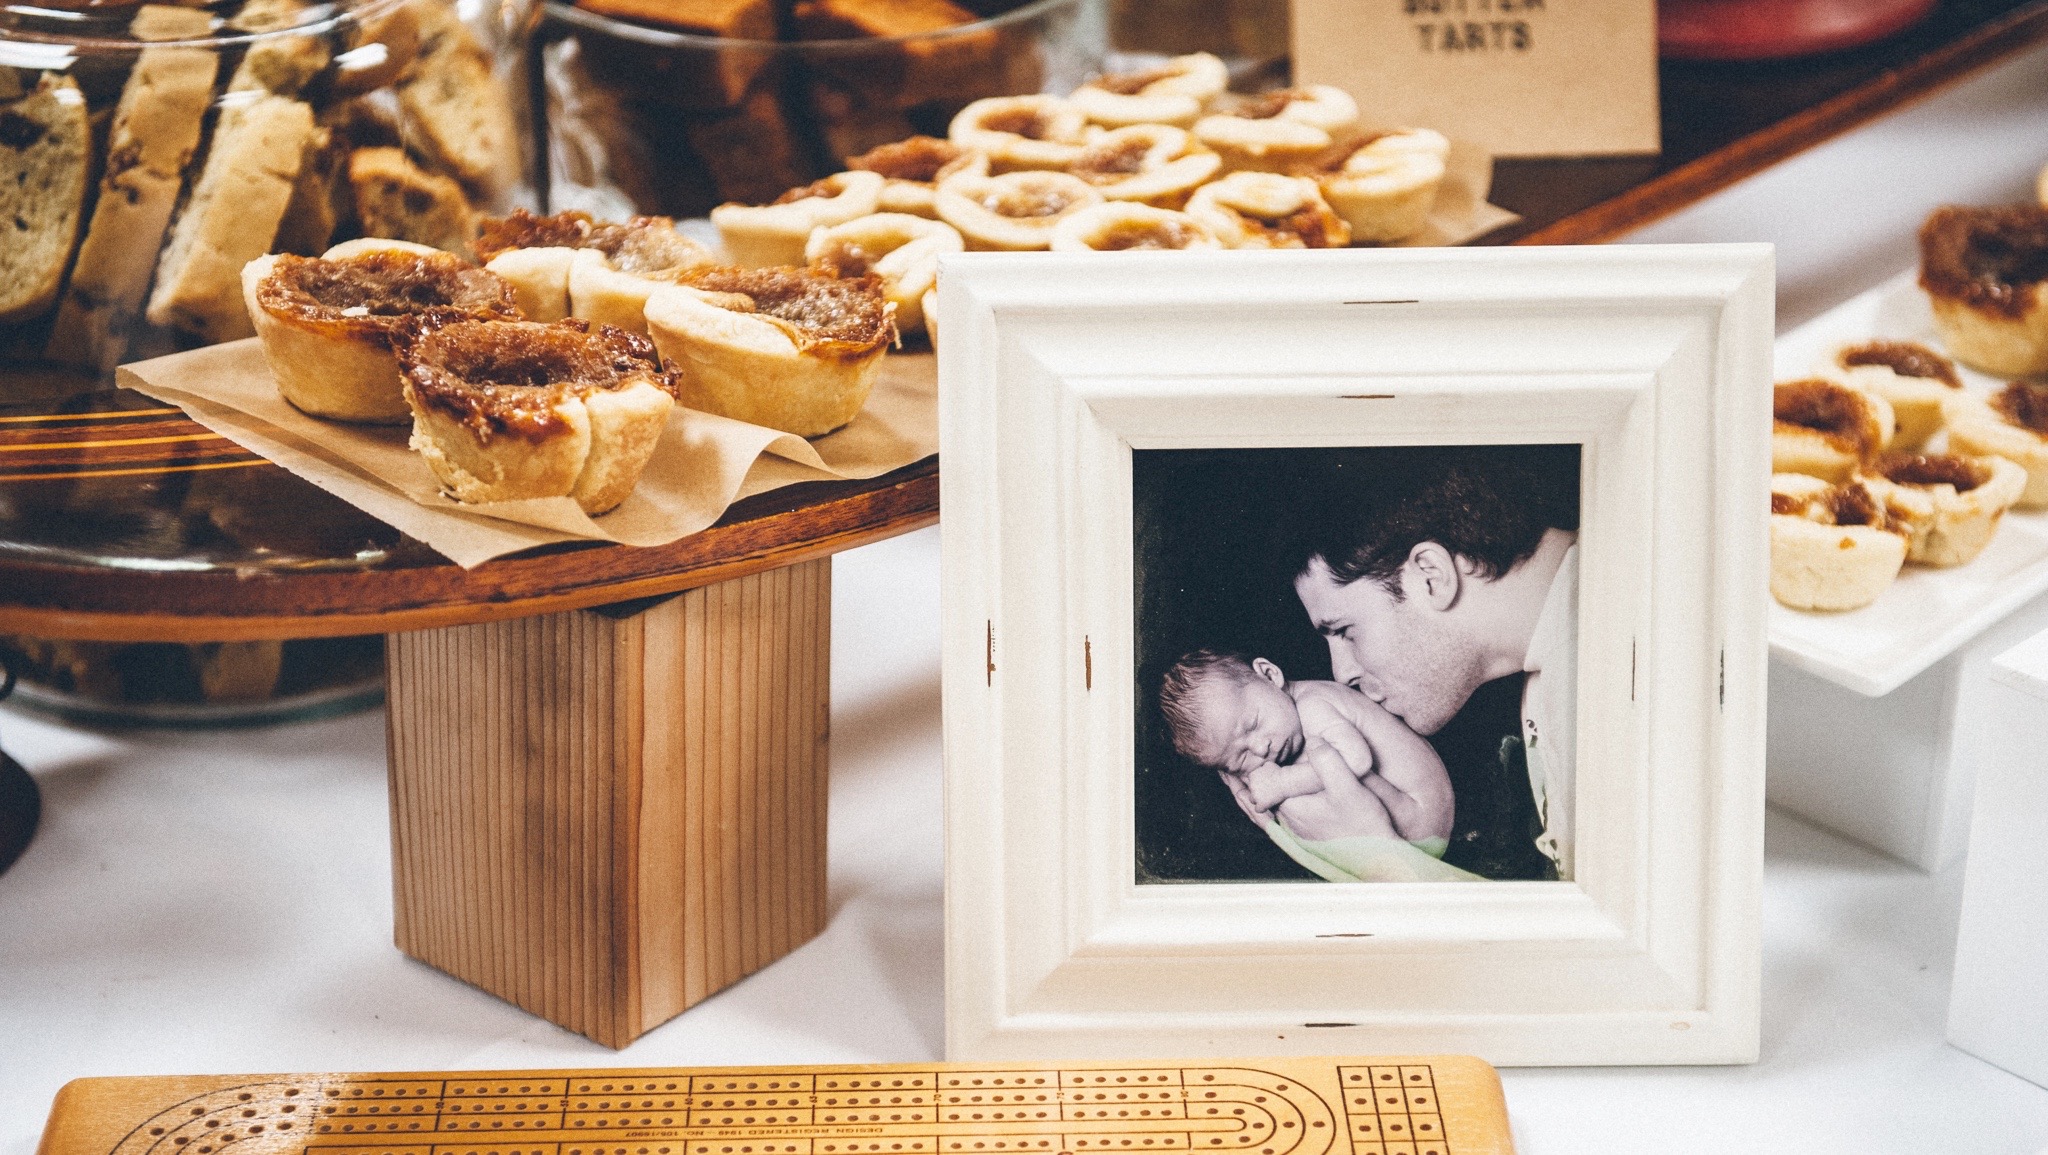
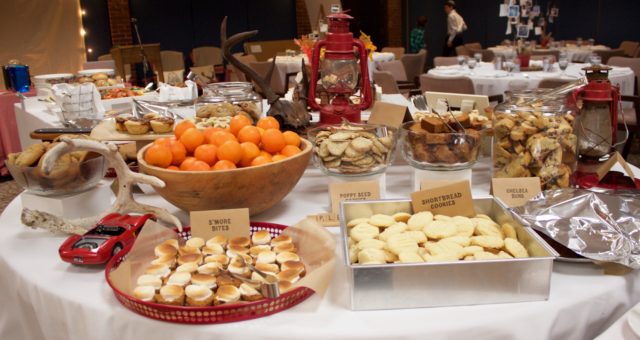
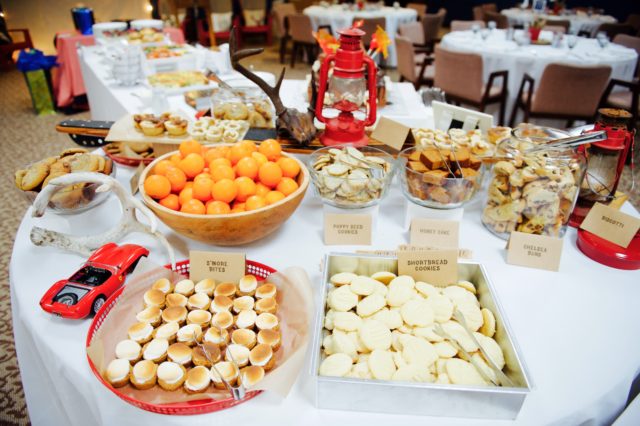
But the best part of brunch was the dessert table! This is where I truly got to showcase my baking skills, with the help of my mom, sister and mother-in-law. First, I decorated the table with objects that represented my son and the cottage–Scrabble pieces that said “Help Yourself”, antlers, a red model sports car, an old cribbage board, a vintage waterski, red oil lanterns, and a photo of my husband holding our son as a newborn.
All the baked good were displayed on red tin trays, big glass cookie jars with red lids, even the waterski was used to display the homemade butter tarts.
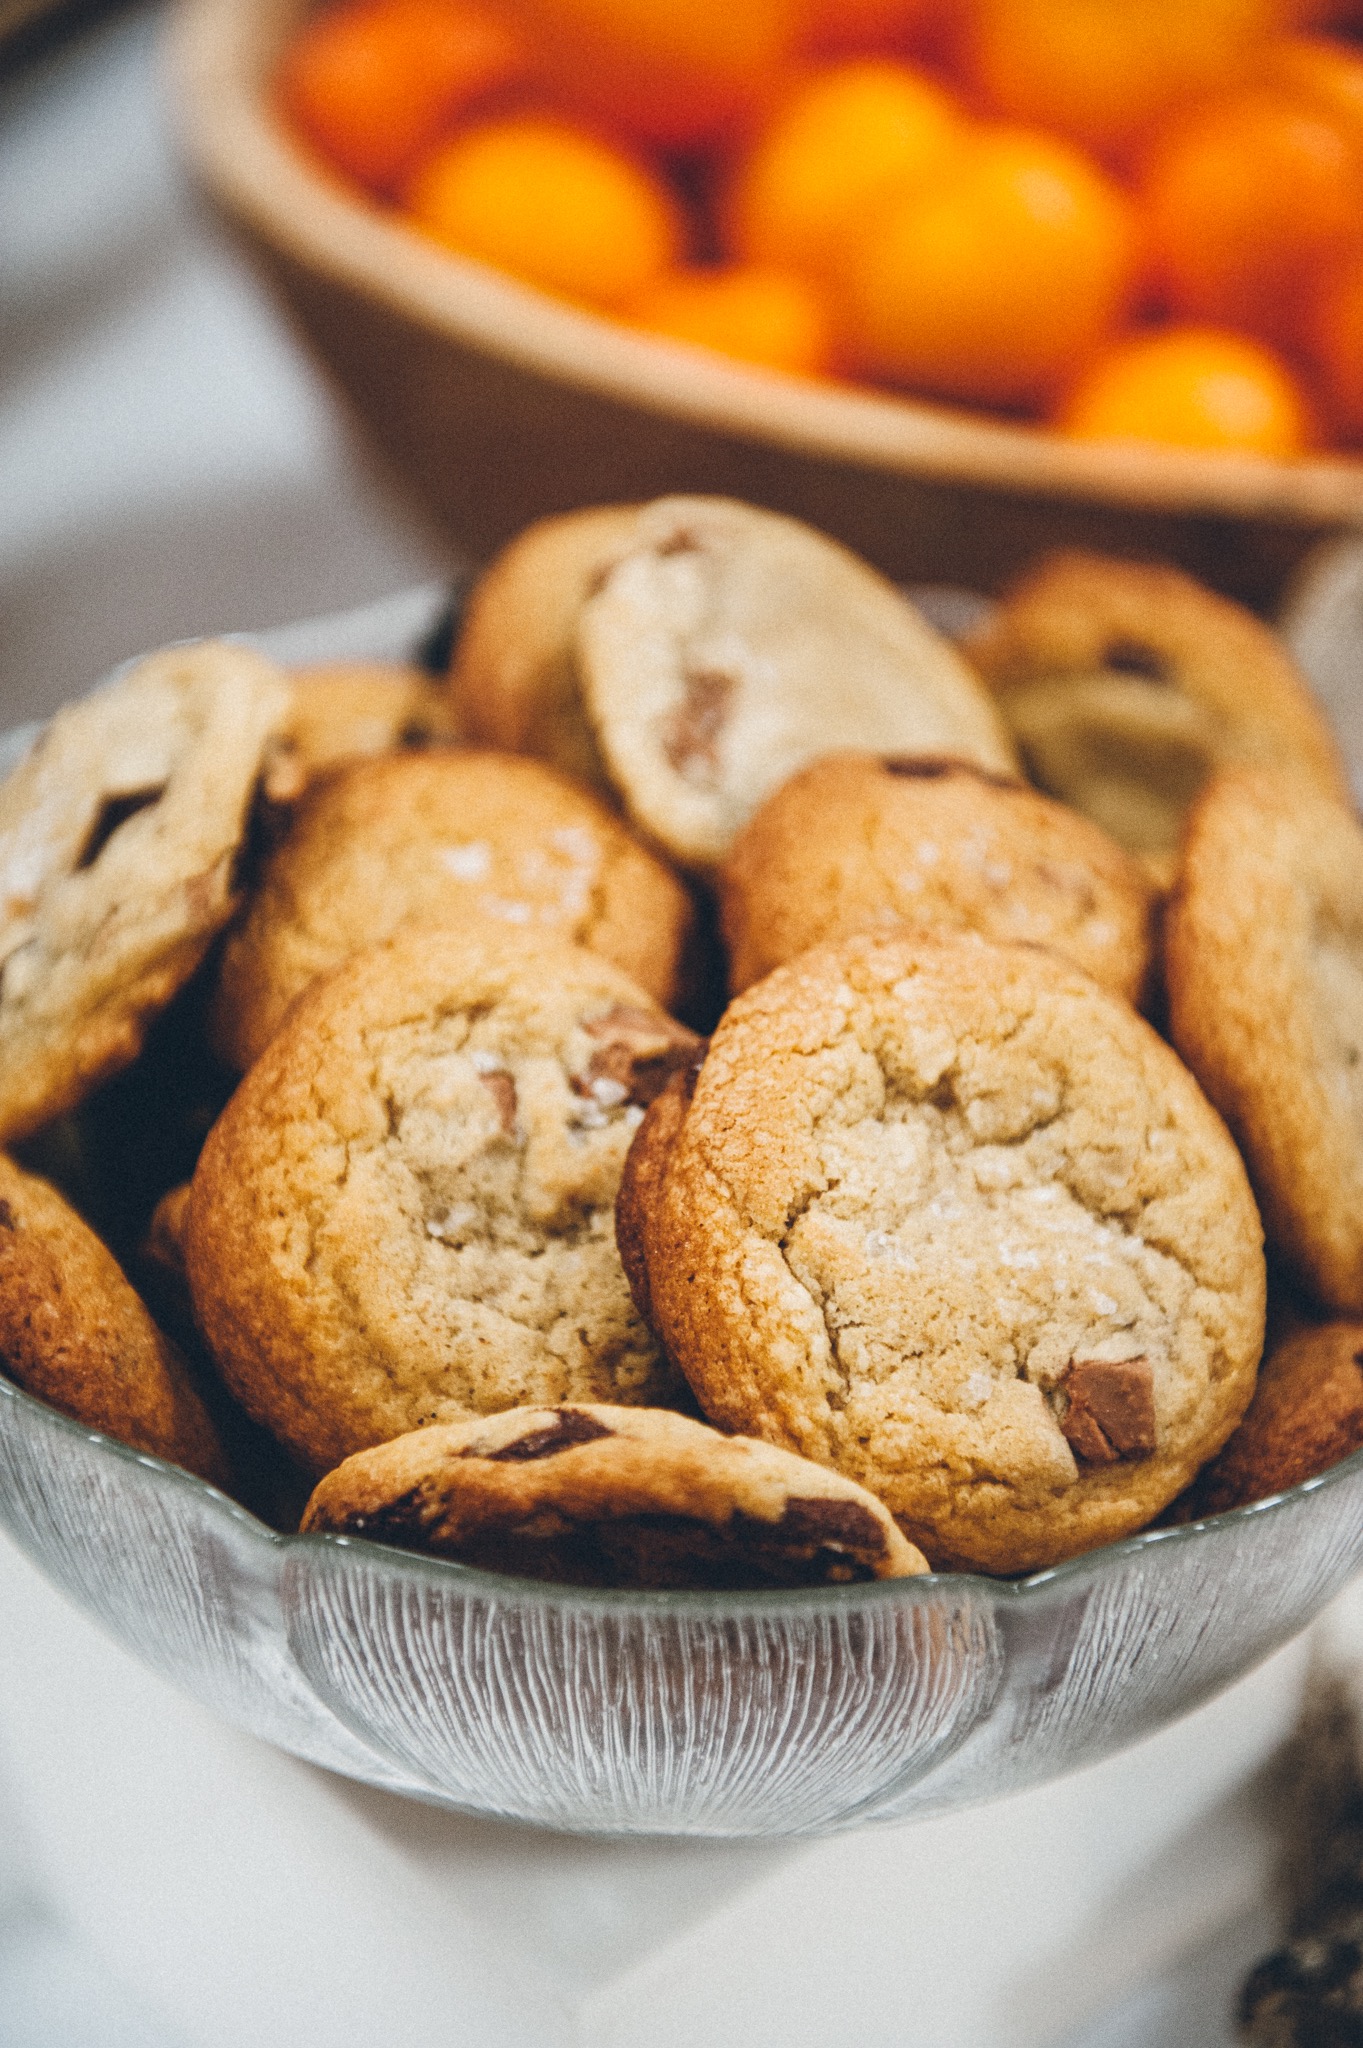
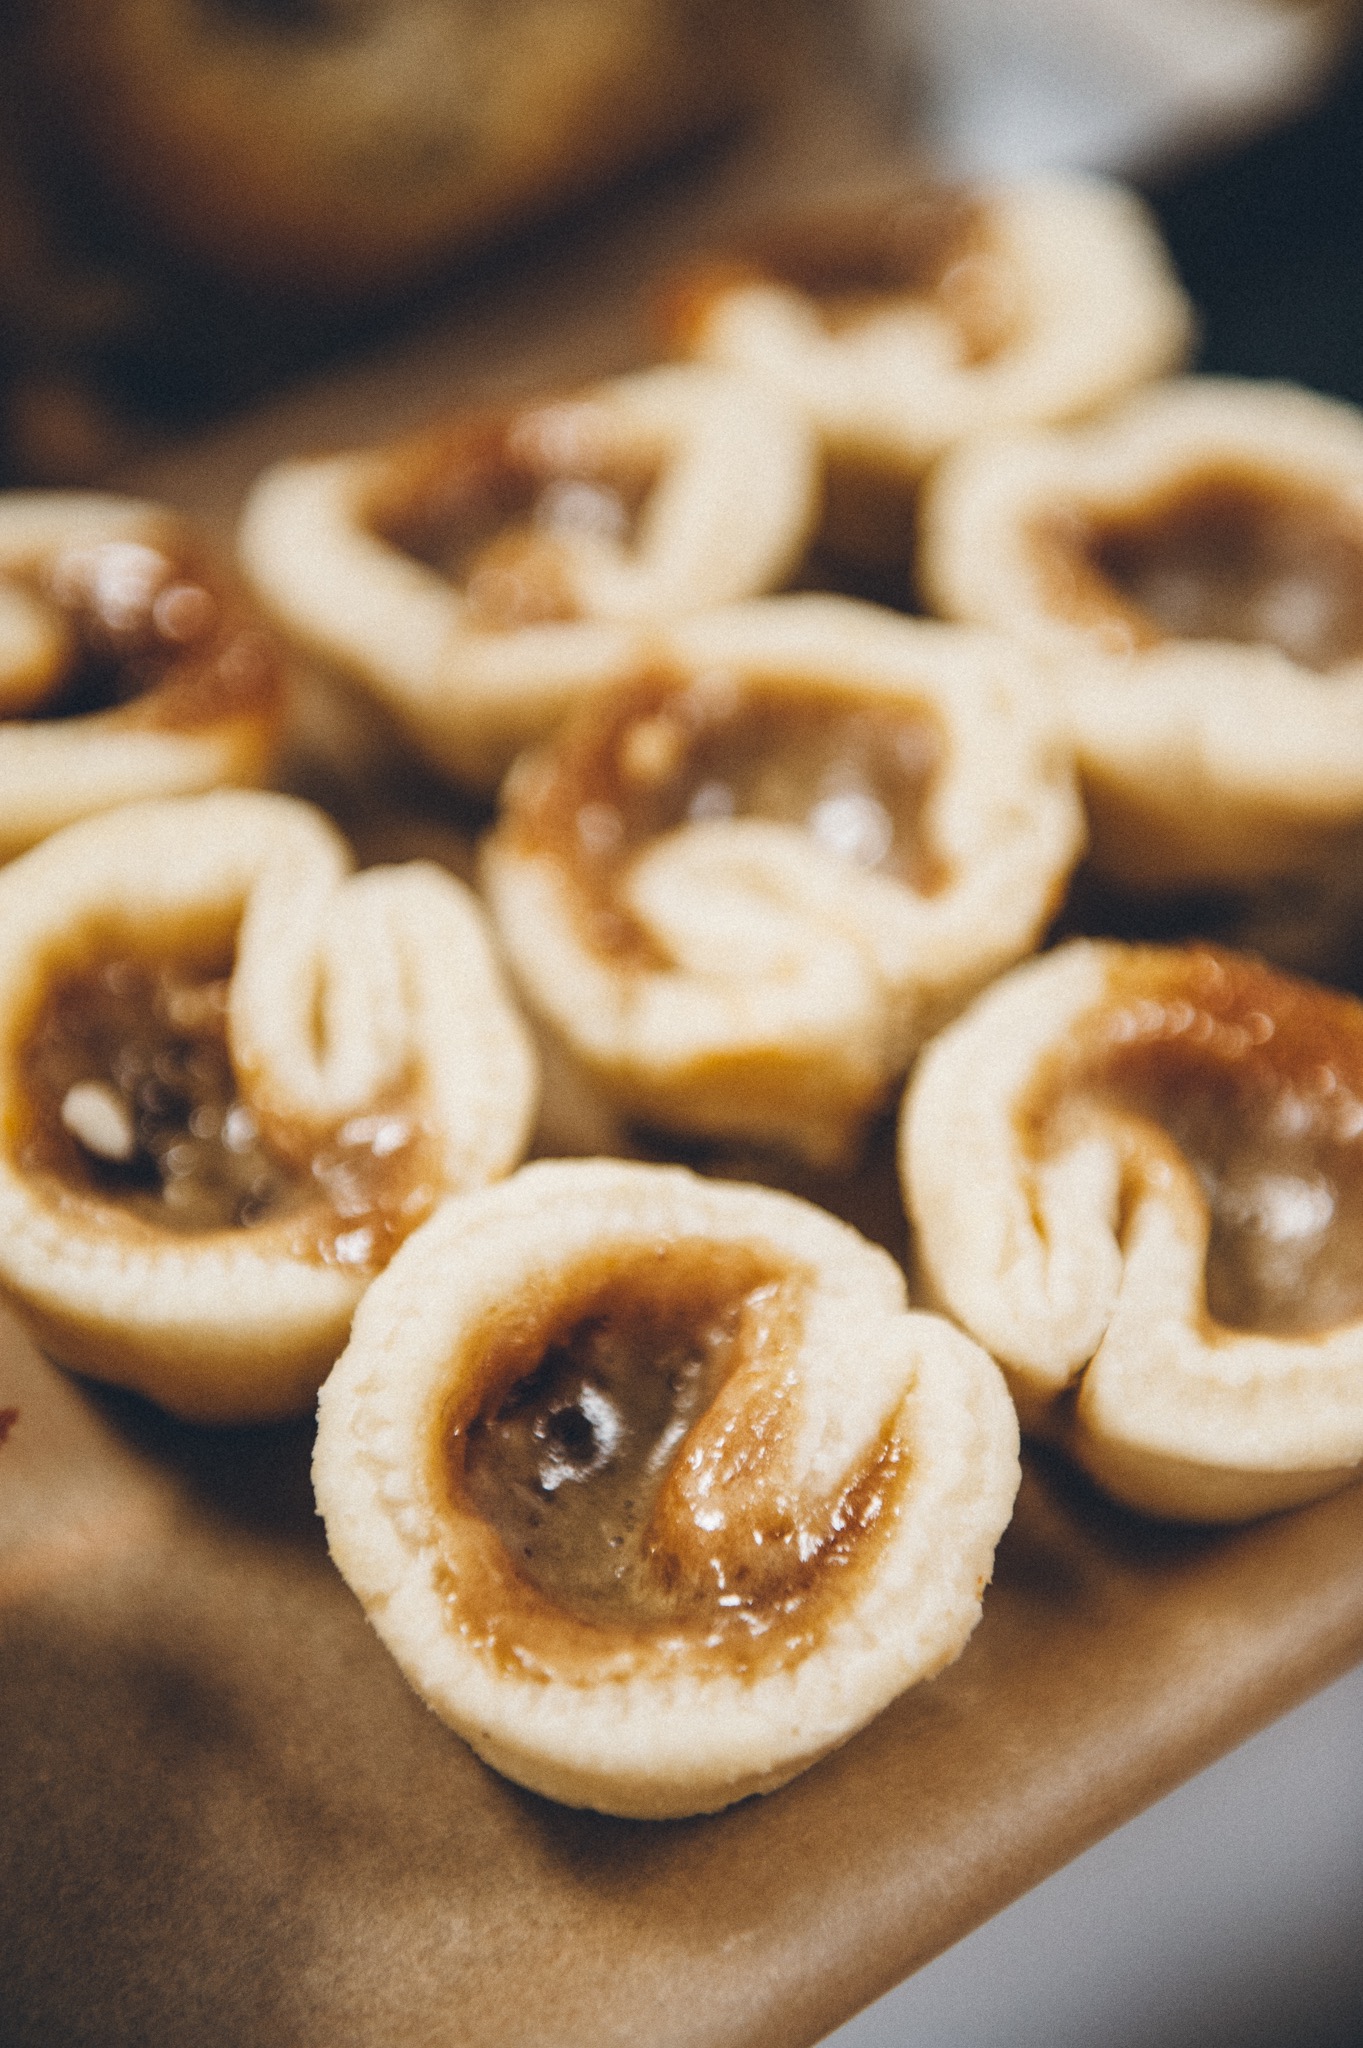
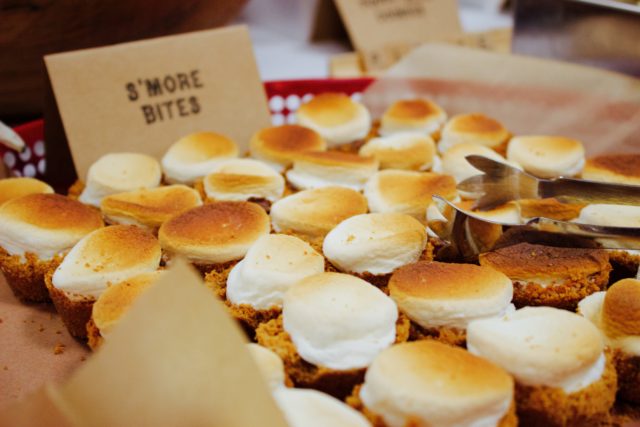
There were homemade salted chocolate chunk cookies, s’mores bites, butter tarts, honey cake, shortbreads, poppy seed cookies, ginger cookies and also chelsea buns from the Thornbury bakery (the only thing I didn’t bake!).
The Dessert Table
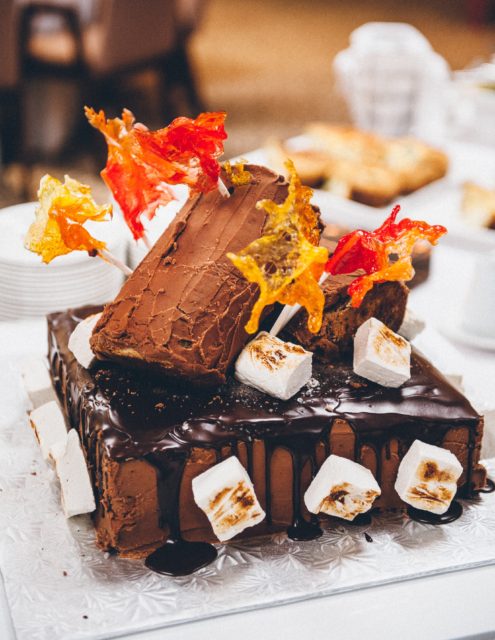
It wouldn’t be a celebration without a cake, right? Of course I baked a cake! It’s the giant, incredibly chocolatey cake recipe from Deb Perlman’s Smitten Kitchen. It’s the same cake I baked for my parents’ 40th wedding anniversary, except this time I made marshmallows, charred them and put them on the cake. I also made banana chocolate chip cake “logs” and I made flames from melted red and orange lollipops. A candy maker I am not!
Campfire cake
I can’t say the cake turned out as nicely as I would have liked from a visual perspective, but it tasted damn good.
Credit for all the photos goes to Julius Ding of Julius and James Photography. This was their FIRST Bar Mitzvah photo shoot, and they really did capture the essence of the celebration, rather than the staged photos of the family and Bar Mitzvah boy that we all too often see. This was a celebration in real life and I’m so glad Julius was there to capture the moment.
There is so much more to tell you about the day because it didn’t end with the brunch! But I think I’ll save those details for another post. I’m starting to get tired just thinking about it again. Phew!
Feel free to contact me if you have any questions or want to learn more about what I did and how I did or where I got my ideas from.
After watching Cooked on Netflix, I was inspired to make my own sourdough bread. After all, Michael Pollan swore it was the easiest thing in the world. All it takes is flour, water, and some wild yeast encouraged by the bacteria floating through the air in your house. Easy!
Not so.
My first attempt to make sourdough starter was an abysmal failure. The flour and water looked–and smelled–like glue, which I guess it was.
Then I showed up at work with a homemade sour cherry pie (that’s another post!) and started talking about baking with a colleague. Little did I know that she, too, had been inspired to attempt sourdough bread after watching Michael Pollan and she had met with some success. She offered to share some of her sourdough starter with me, pointed me to a website that had easy to follow instructions and then I was off to the races!
I had my doubts about the starter. It failed once again and I ended up with a loaf of glue. See specimen here:
Glue bread masquerading as sourdough bread
So I decided to persevere. For those who know me–and I mean, really know me, I am a relatively impatient person. So waiting for a sourdough starter to be ready, or waiting for bread to proof, are exercises in patience for me. And you can’t rush a good loaf of bread. I fed my starter again and decided to just watch it for about 24 hours. Sure enough it came back to life and started bubbling away, and almost “breathing”. That’s the best way I can describe it. It’s literally alive! When it had filled up the bowl, I decided it was show time.
I mixed the starter with flour and water and mixed it with the dough hook. I added a spoonful of kosher salt too. Some recipes tell you to knead the bread a lot and to do some of the kneading by hand to encourage the glutens to bind with each other. Other recipes say to be careful not to overdo it with the kneading because you don’t want to destroy the wild yeast in the starter that will give the bread that lovely bubbled centre. It’s really hard to know which recipe to follow and what measurements to use when you’re a beginner. This is when the internet is not your friend, but seems to be deliberately working against you to leave you second guessing which is the best recipe to follow.
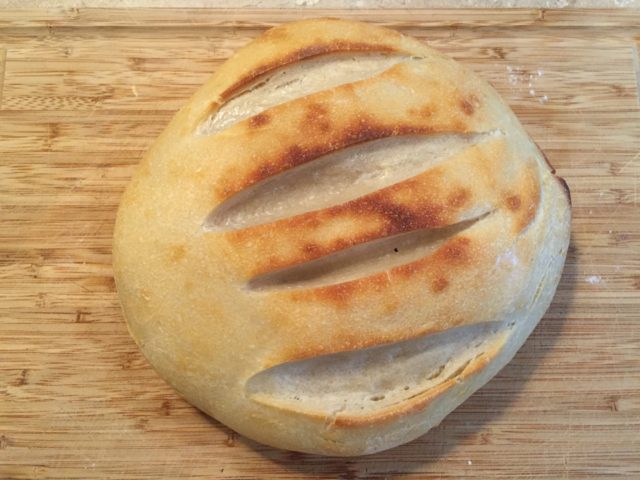
In the end I found a pretty straightforward recipe at Cultures for Health. There’s even a nifty video that walks you through the recipe, but I decided to try it without watching the video. I think I might watch the video next time.
So here are the results:
Here’s the sourdough starter
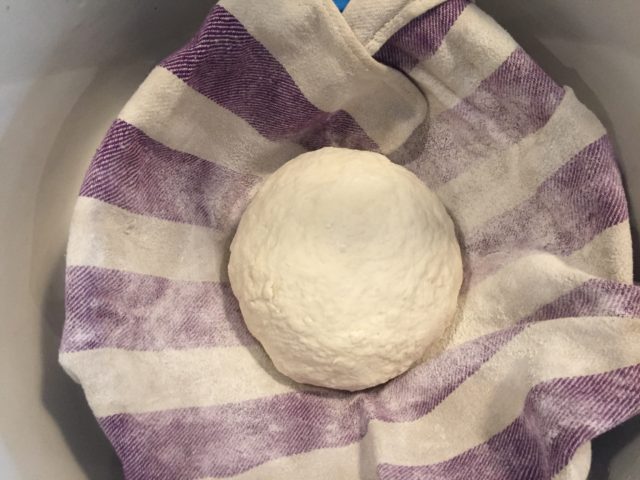
Here’s the dough in the proofing bowl
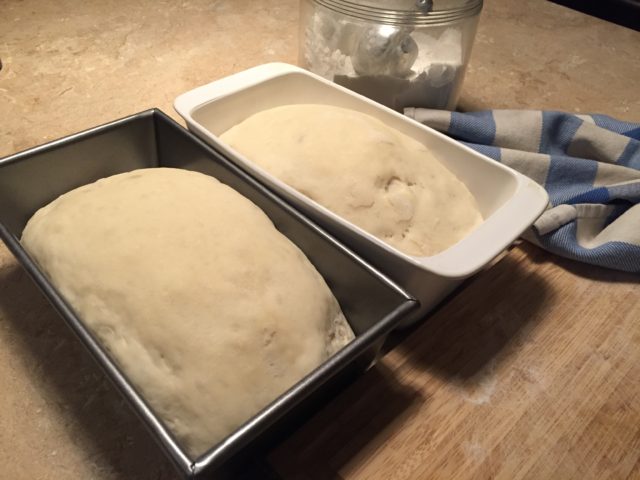
I made two loaves to proof (this may be where things went wrong)
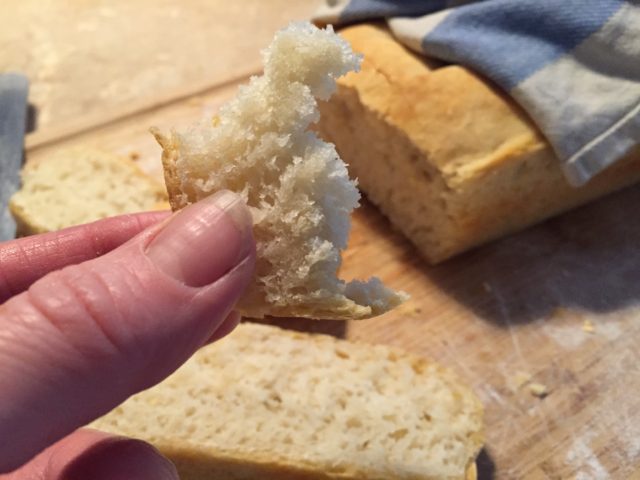
The inside of the bread was very dense
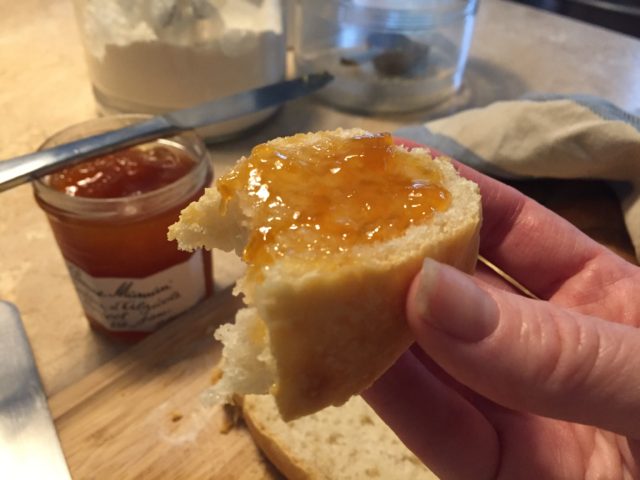
A slice of sourdough slathered with apricot jam
In the end the bread was quite tasty–crispy on the outside and nice and soft on the inside with some air bubbles that are indicative of sourdough bread. There is a nice tang to the flavour and the kids seemed to like it, which is a good thing. It didn’t puff up as much as it probably should have after proofing, which could mean one of two things: the sourdough starter wasn’t as mature as it should have been to help the bread rise, or else I didn’t leave it to proof long enough (12-ish hours???).
I can see why making bread is addictive. It’s not an exact science, and yet the success of your bread making depends entirely on science.
The sourdough starter is once again percolating away in the glass bowl on the counter and I look forward to my next attempt at making a loaf of sourdough. Let me know what the secret of your success is when making sourdough. I could use all the help I can get!